User Documentation - Automata Deploy
Installing the Automata Software Portal Client Application
The Automata Software Portal is the client-side application that must be installed on all of your organization’s managed Macs. This application provides the following features:
Enables the download and installation of managed software and updates.
Enables the installation of optional applications by the end-user via self-service.
Enables the communication of hardware end software inventory for the reporting module.
There are three ways to install the Automata Software Portal application on your managed Macs.
Manually

The most straight forward way to install the Automata Software Portal application is by double-clicking on the installation package and stepping through the install prompts interactively.
Upon successful installation, you will see a number of notifications about background services that have been enabled to run. These are required for the Automata Software Portal to regularly communicate with the cloud server and pull down applications and updates.
Using Apple Remote Desktop

If your organization utilizes Apple Remote Desktop for client management, you can install the Automata Software Portal to one or more Macs using the ‘Install’ option in Apple Remote Desktop toolbar.
Select the Automata installation Package and install it using similar settings found in Figure 1.2.
Using Mobile Device Management (MDM)

If you are utilizing a Mobile Device Management (MDM) solution such as JAMF Pro, Microsoft Intune, Mosyle, and others, you can deploy the Automata Software Portal as a custom or line-of-business application.
Consult your MDM documentation for how to upload and install a *.pkg based Mac application.
The Automata Software Portal installer package is optimized for MDM deployment.
Once the Automata Software Portal application has been deployed to all of your managed Macs, you are ready to select your applications through the Software Catalog web application.
Signing Into the Automata Deploy Software Catalog Web Application
To get started using the Automata Deploy Software Catalog website, you will need to open a new web browser window and enter https://catalog.automata-tech.com. You will be prompted to sign in with your default username and password, provided by Automata Technology Services. At your first successful login you will change your default password and configure multi-factor authentication via Authentik.
Note: You can utilize any number of mobile authenticators with Authentik, including Microsoft Authenticator. Automata Technology Services recommends using the authentication app that you prefer.
Once you have successfully signed into the Automata customer portal, you can click on ‘Automata Software Catalog’ to access the web application from the dashboard as shown in Figure 1.4.

USING THE AUTOMATA DEPLOY SOFTWARE CATALOG WEB APPLICATION
Upon first signing into the Automata Deploy Software Catalog, you will want to familiarize yourself with the overall user interface. Figure 1.5 provides a diagram of the key features and options available.

A - User Menu. Use this to sign-out, access documentation, and contact technical support.
B - Automata Shortcut. Use this button to access the Automata Technology Services home page.
C - Filter Dropdown List. Filter the applications based on status such as those set to ‘Install’ or ‘Optional’.
D - Pagination Dropdown List. Use this to select how many applications are presented on screen at once.
E - Software Information. This is where you select applications for deployment. Software is sortable by application name, developer, and category. You can see the latest version currently in production. To manage software, select one of the following checkboxes:
Install: Applications selected will be automatically installed and updated without any end-user interaction.
Optional: Applications selected will not install automatically but will appear as available for end-users to install via the Automata Software Portal application. Once installed, the applications will be automatically updated when new versions are available.
Uninstall: Applications selected will be uninstalled at the next update interval (approximately one hour). You can use this to remove applications that are no longer needed or to proactively restrict and remove applications that you do not want users to have access to such as Social Media or Gaming applications.
F - Import Date. This column lists the date that the current application version was packaged and made available for installation.
G - Search Bar. Use this to search for a specific application in the catalog.
Once you have made your software installation selections, click on the Save Manifest button to save changes and deployment updates will begin momentarily on your managed Macs.

INSTALLATION PACKAGE DETAILS
The Automata Software Portal application is packaged in two parts, signed and notarized using an official Apple Developer account. Part one includes the Automata Software Portal application which is built on Munki, an open-source tool for software installation. Part two includes Sal, an open source reporting tool that collects inventory information about hardware and software installed on the managed Mac.
The Automata Software Portal application automatically updates itself as-needed.
Using the Automata Software Portal Application
End-users have the option to launch and use the Automata Software Portal application. It is not required that end-users use the application for Automata Deploy to automatically install and update applications that are selected as ‘Install’. However, if you are deploying any applications as ‘Optional’, then your end-users will need to use the application to add or remove those applications.
Figures 1.6 - 1.8 provides an overview of the Automata Software Portal Application.
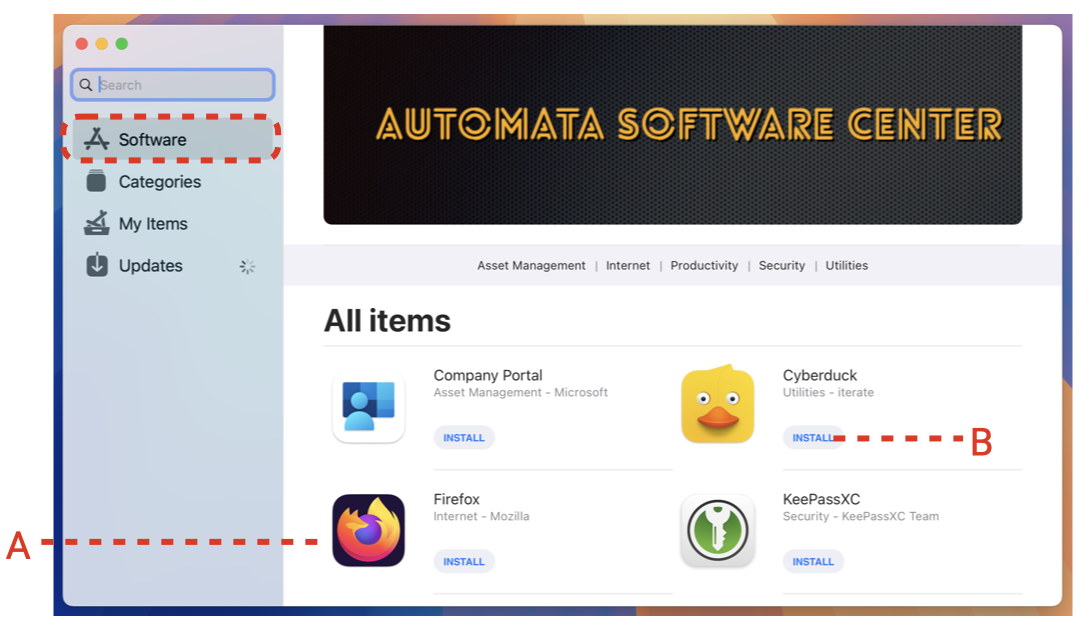
A - Optional Applications. The Software tab provides a list of all applications marked as ‘Optional’ that your end-users are permitted to install via self-service.
B - Install Button. To install an application, the end-user simply has the click the install button to initiate an installation at the next update interval. Automata Deploy is configured to allow Standard user accounts to install applications — local admin rights are not required.

A - Remove Button. The My Items tab lists all Optional applications that are installed on the machine. Users can uninstall these Optional applications at will by clicking the Remove button for that application.
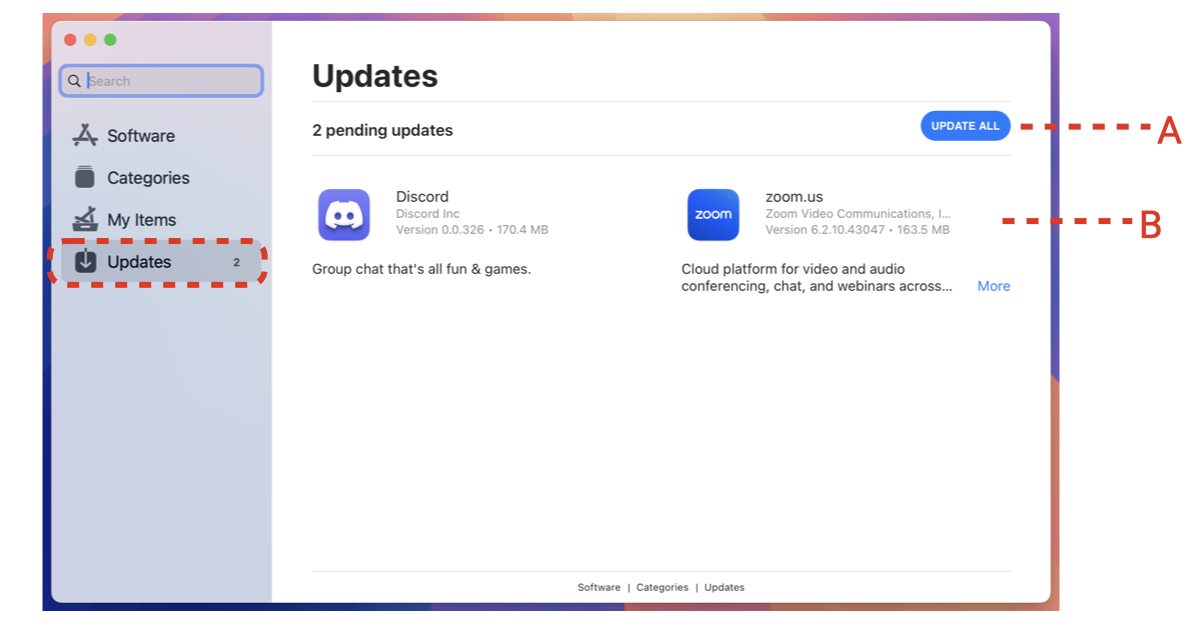
A - Update All Button. On the Updates tab, end-users can force an update manually by clicking the Update All button. This will initiate an install of all pending updates listed outside of the regular automated update interval.
B - Pending Install or Update. This area provides a list of all applications that are set to install or update next. Each application will include a publisher, version, and short description of the application.
Technical Support & Other Information
Network Ports & Hosts
Automata Deploy uses TCP ports 80 and 443 for web and SSL communication.
Whitelist *.automata-tech.com & 68.183.16.208.
Reporting Technical Issues
If you are experiencing a technical issue with Automata Deploy or have a question/concern, submit a help desk ticket here.
Frequently Asked Questions (FAQ)
Please access the most up-to-date FAQ from our website.
Terms & Conditions
By using Automata Deploy, you agree to our terms and conditions found here.